We didn't tell anyone what Mya's name was before she was born. It's something that we decided to keep to ourselves, as many people do, for the obvious reason of name backlash. Even though we knew for months that the tiny baby in my belly would be named Mya, we worried that our decision would be hindered by the opinions of others. We worried, knowing that it was impossible to pick a name that literally everyone loved, that a snide remark or negative comment would make us question our decision or place us in an awkward position. Honestly, when I think about it now, I think it's terrible that this is how so many parents-to-be feel.

So this time round, we changed our minds. We finally decided on a name that we both love and we decided to tell the world, regardless of our previous fears. Maybe it's our way of saying "We love it, and if you don't, that's okay". Or maybe it's a statement regarding our feelings on parenthood this time round...feeling that much more confident about the whole process of it all since we've been through it before. We also wanted to be able to talk to Mya openly about her brother and call him by name, without questioning who was around us, hearing us.
So, in saying this, here ya go...our little man will officially be named:

I made this name sign the other week for his nursery, and it was so easy and cheap to make, I thought I'd pass along how I did it in case there were any others out there who wanted to make something similar. For another (more girly) version of this, you can click here to see what I made for Mya's room before she was born.
Here's how I did it:
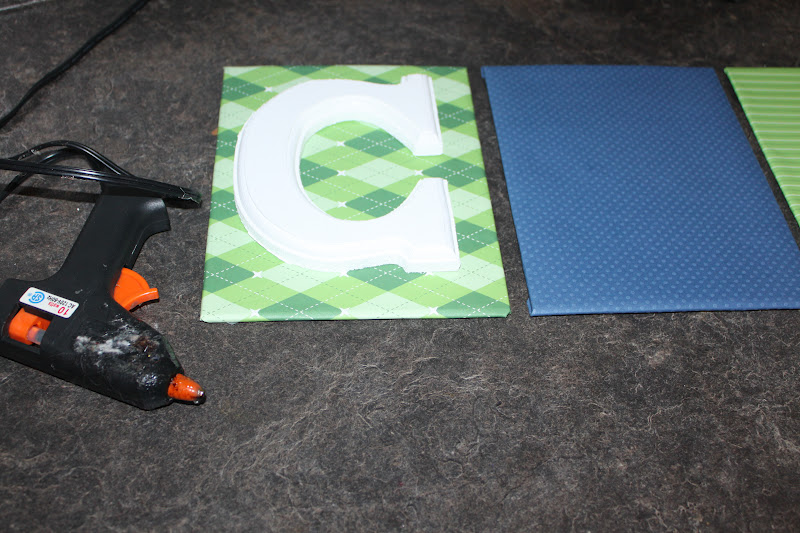
I bought the wooden letters at a dollar store near my parents house (for only $1.25 each!). I know they sell them at Walmart and Michaels too (Walmart is cheaper than Michaels though, but Michaels has a greater selection of letters, just FYI). I also bought small artist canvas' at Dollarama (which are supposed to be used to paint on, but work perfectly for this instead). They were two for $1. You'll also need scrapbook paper (I chose 3 different patterns), a glue gun and a glue stick.

1) Cover the one side of the artist canvas completely with glue.

2) Wrap it like a present with your scrapbook paper and glue the ends down as well. I even threw some tape down on it as well, just to be sure it stayed put.

3) Grab some paint and paint several coats onto your letters. I had some extra semi-gloss white paint in my basement that we use for our baseboards, so I just used that.

4) Once your letters are dry, use your glue gun and glue the letters down onto the front of your paper-covered canvas'.
5) Use your glue gun to glue some ribbon onto the back of each board, and hang. Voila! So easy, so cheap, so cute.

And there it is...our new little bundle of joy will be named Carter. I just can't wait to meet this sweet little boy and finally be able to whisper all the I love you's to him that I've been saying to my belly over the past 30 weeks. Sweet little Carter. I like the sound of that.

No comments:
Post a Comment